本文是【从零开始,一起学习开发个 Flutter App 吧】路上的第 2 篇文章。
本文将解决上一篇留下的问题: Dart 中是如何进行异步处理的?我们首先简单介绍了 Dart 中常用的异步处理 Future、sync和await ;第二部分试图分析Dart作为单线程语言的异步实现原理,进一步介绍IO模型和事件循环模型;最后介绍 如何在 Dart 实现多线程以线程的相互通信。
如果你熟悉 JavaScript 的 Promise 模式的话,发起一个异步http请求,你可以这样写:
1 | new Promise((resolve, reject) =>{ |
2 | // 发起请求 |
3 | const xhr = new XMLHttpRequest(); |
4 | xhr.open("GET", 'https://www.nowait.xin/'); |
5 | xhr.onload = () => resolve(xhr.responseText); |
6 | xhr.onerror = () => reject(xhr.statusText); |
7 | xhr.send(); |
8 | }).then((response) => { //成功 |
9 | console.log(response); |
10 | }).catch((error) => { // 失败 |
11 | console.log(error); |
12 | }); |
Promise 定义了一种异步处理模式:do… success… or fail…。
在 Dart 中,与之对应的是Future对象:
1 | Future<Response> respFuture = http.get('https://example.com'); //发起请求 |
2 | respFuture.then((response) { //成功,匿名函数 |
3 | if (response.statusCode == 200) { |
4 | var data = reponse.data; |
5 | } |
6 | }).catchError((error) { //失败 |
7 | handle(error); |
8 | }); |
这种模式简化和统一了异步的处理,即便没有系统学习过并发编程的同学,也可以抛开复杂的多线程,开箱即用。
Future
Future 对象封装了Dart 的异步操作,它有未完成(uncompleted)和已完成(completed)两种状态。
在Dart中,所有涉及到IO的函数都封装成Future对象返回,在你调用一个异步函数的时候,在结果或者错误返回之前,你得到的是一个uncompleted状态的Future。
completed状态也有两种:一种是代表操作成功,返回结果;另一种代表操作失败,返回错误。
我们来看一个例子:
1 | Future<String> fetchUserOrder() { |
2 | //想象这是个耗时的数据库操作 |
3 | return Future(() => 'Large Latte'); |
4 | } |
5 | |
6 | void main() { |
7 | fetchUserOrder().then((result){print(result)}) |
8 | print('Fetching user order...'); |
9 | } |
通过then来回调成功结果,main会先于Future里面的操作,输出结果:
1 | Fetching user order... |
2 | Large Latte |
在上面的例子中,() => 'Large Latte')是一个匿名函数,=> 'Large Latte' 相当于 return 'Large Latte'。
Future同名构造器是factory Future(FutureOr<T> computation()),它的函数参数返回值为FutureOr<T>类型,我们发现还有很多Future中的方法比如Future.then、Future.microtask的参数类型也是FutureOr<T>,看来有必要了解一下这个对象。
FutureOr<T> 是个特殊的类型,它没有类成员,不能实例化,也不可以继承,看来它很可能只是一个语法糖。
1 | abstract class FutureOr<T> { |
2 | // Private generative constructor, so that it is not subclassable, mixable, or |
3 | // instantiable. |
4 | FutureOr._() { |
5 | throw new UnsupportedError("FutureOr can't be instantiated"); |
6 | } |
7 | } |
你可以把它理解为受限制的dynamic类型,因为它只能接受Future<T>或者T类型的值:
1 | FutureOr<int> hello(){} |
2 | |
3 | void main(){ |
4 | FutureOr<int> a = 1; //OK |
5 | FutureOr<int> b = Future.value(1); //OK |
6 | FutureOr<int> aa = '1' //编译错误 |
7 | |
8 | int c = hello(); //ok |
9 | Future<int> cc = hello(); //ok |
10 | String s = hello(); //编译错误 |
11 | } |
在 Dart 的最佳实践里面明确指出:请避免声明函数返回类型为FutureOr<T>。
如果调用下面的函数,除非进入源代码,否则无法知道返回值的类型究竟是int 还是Future<int>:
1 | FutureOr<int> triple(FutureOr<int> value) async => (await value) * 3; |
正确的写法:
1 | Future<int> triple(FutureOr<int> value) async => (await value) * 3; |
稍微交代了下FutureOr<T>,我们继续研究Future。
如果Future内的函数执行发生异常,可以通过Future.catchError来处理异常:
1 | Future<void> fetchUserOrder() { |
2 | return Future.delayed(Duration(seconds: 3), () => throw Exception('Logout failed: user ID is invalid')); |
3 | } |
4 | |
5 | void main() { |
6 | fetchUserOrder().catchError((err, s){print(err);}); |
7 | print('Fetching user order...'); |
8 | } |
输出结果:
1 | Fetching user order... |
2 | Exception: Logout failed: user ID is invalid |
Future支持链式调用:
1 | Future<String> fetchUserOrder() { |
2 | return Future(() => 'AAA'); |
3 | } |
4 | |
5 | void main() { |
6 | fetchUserOrder().then((result) => result + 'BBB') |
7 | .then((result) => result + 'CCC') |
8 | .then((result){print(result);}); |
9 | } |
输出结果:
1 | AAABBBCCC |
async 和 await
想象一个这样的场景:
- 先调用登录接口;
- 根据登录接口返回的token获取用户信息;
- 最后把用户信息缓存到本机。
接口定义:
1 | Future<String> login(String name,String password){ |
2 | //登录 |
3 | } |
4 | Future<User> fetchUserInfo(String token){ |
5 | //获取用户信息 |
6 | } |
7 | Future saveUserInfo(User user){ |
8 | // 缓存用户信息 |
9 | } |
用Future大概可以这样写:
1 | login('name','password').then((token) => fetchUserInfo(token)) |
2 | .then((user) => saveUserInfo(user)); |
换成async 和await 则可以这样:
1 | void doLogin() async { |
2 | String token = await login('name','password'); //await 必须在 async 函数体内 |
3 | User user = await fetchUserInfo(token); |
4 | await saveUserInfo(user); |
5 | } |
声明了async 的函数,返回值是必须是Future对象。即便你在async函数里面直接返回T类型数据,编译器会自动帮你包装成Future<T>类型的对象,如果是void函数,则返回Future<void>对象。在遇到await的时候,又会把Futrue类型拆包,又会原来的数据类型暴露出来,请注意,await 所在的函数必须添加async关键词。
await的代码发生异常,捕获方式跟同步调用函数一样:
1 | void doLogin() async { |
2 | try { |
3 | var token = await login('name','password'); |
4 | var user = await fetchUserInfo(token); |
5 | await saveUserInfo(user); |
6 | } catch (err) { |
7 | print('Caught error: $err'); |
8 | } |
9 | } |
得益于async 和await 这对语法糖,你可以用同步编程的思维来处理异步编程,大大简化了异步代码的处理。
注:Dart 中非常多的语法糖,它提高了我们的编程效率,但同时也会让初学者容易感到迷惑。
送多一颗语法糖给你:
1 | Future<String> getUserInfo() async { |
2 | return 'aaa'; |
3 | } |
4 | |
5 | 等价于: |
6 | |
7 | Future<String> getUserInfo() async { |
8 | return Future.value('aaa'); |
9 | } |
Dart异步原理
Dart 是一门单线程编程语言。对于平时用 Java 的同学,首先可能会反应:那如果一个操作耗时特别长,不会一直卡住主线程吗?比如Android,为了不阻塞UI主线程,我们不得不通过另外的线程来发起耗时操作(网络请求/访问本地文件等),然后再通过Handler来和UI线程沟通。Dart 究竟是如何做到的呢?
先给答案:异步 IO + 事件循环。下面具体分析。
I/O 模型
我们先来看看阻塞IO是什么样的:
1 | int count = io.read(buffer); //阻塞等待 |
注: IO 模型是操作系统层面的,这一小节的代码都是伪代码,只是为了方便理解。
当相应线程调用了read之后,它就会一直在那里等着结果返回,什么也不干,这是阻塞式的IO。
但我们的应用程序经常是要同时处理好几个IO的,即便一个简单的手机App,同时发生的IO可能就有:用户手势(输入),若干网络请求(输入输出),渲染结果到屏幕(输出);更不用说是服务端程序,成百上千个并发请求都是家常便饭。
有人说,这种情况可以使用多线程啊。这确实是个思路,但受制于CPU的实际并发数,每个线程只能同时处理单个IO,性能限制还是很大,而且还要处理不同线程之间的同步问题,程序的复杂度大大增加。
如果进行IO的时候不用阻塞,那情况就不一样了:
1 | while(true){ |
2 | for(io in io_array){ |
3 | status = io.read(buffer);// 不管有没有数据都立即返回 |
4 | if(status == OK){ |
5 | |
6 | } |
7 | } |
8 | } |
有了非阻塞IO,通过轮询的方式,我们就可以对多个IO进行同时处理了,但这样也有一个明显的缺点:在大部分情况下,IO都是没有内容的(CPU的速度远高于IO速度),这样就会导致CPU大部分时间在空转,计算资源依然没有很好得到利用。
为了进一步解决这个问题,人们设计了IO多路转接(IO multiplexing),可以对多个IO监听和设置等待时间:
1 | while(true){ |
2 | //如果其中一路IO有数据返回,则立即返回;如果一直没有,最多等待不超过timeout时间 |
3 | status = select(io_array, timeout); |
4 | if(status == OK){ |
5 | for(io in io_array){ |
6 | io.read() //立即返回,数据都准备好了 |
7 | } |
8 | } |
9 | } |
IO 多路转接有多种实现,比如select、poll、epoll等,我们不具体展开。
有了IO多路转接,CPU资源利用效率又有了一个提升。
眼尖的同学可能有发现,在上面的代码中,线程依然是可能会阻塞在 select 上或者产生一些空转的,有没有一个更加完美的方案呢?
答案就是异步IO了:
1 | io.async_read((data) => { |
2 | // dosomething |
3 | }); |
通过异步IO,我们就不用不停问操作系统:你们准备好数据了没?而是一有数据系统就会通过消息或者回调的方式传递给我们。这看起来很完美了,但不幸的是,不是所有的操作系统都很好地支持了这个特性,比如Linux的异步IO就存在各种缺陷,所以在具体的异步IO实现上,很多时候可能会折中考虑不同的IO模式,比如 Node.js 的背后的libeio库,实质上采用线程池与阻塞 I/O 模拟出来的异步 I/O [1]。
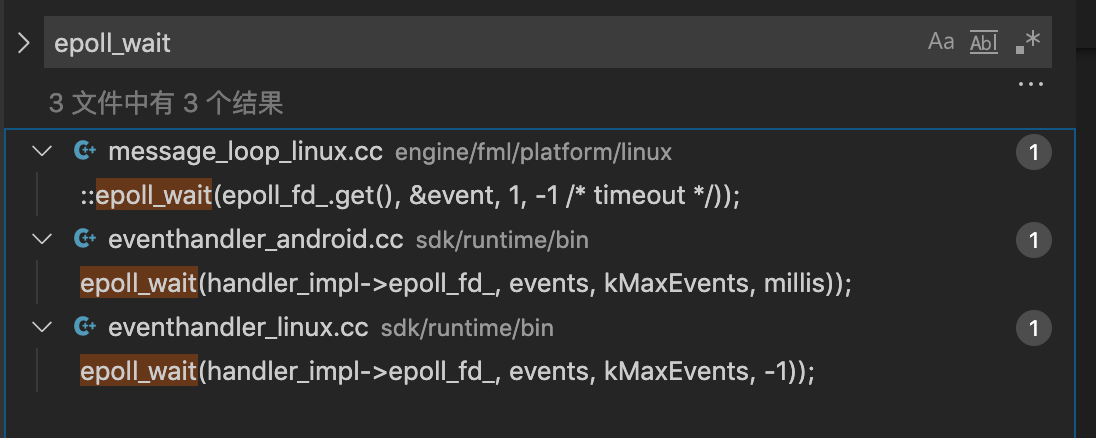
Dart 在文档中也提到是借鉴了 Node.js 、EventMachine, 和 Twisted 来实现的异步IO,我们暂不深究它的内部实现(笔者在搜索了一下Dart VM的源码,发现在android和linux上似乎是通过epoll实现的),在Dart层,我们只要把IO当做是异步的就行了。

我们再回过头来看看上面Future那段代码:
1 | Future<Response> respFuture = http.get('https://example.com'); //发起请求 |
现在你知道,这个网络请求不是在主线程完成的,它实际上把这个工作丢给了运行时或者操作系统。这也是 Dart 作为单进程语言,但进行IO操作却不会阻塞主线程的原因。
终于解决了Dart单线程进行IO也不会卡的疑问,但主线程如何和大量异步消息打交道呢?接下来我们继续讨论Dart的事件循环机制(Event Loop)。
事件循环 (Event Loop)
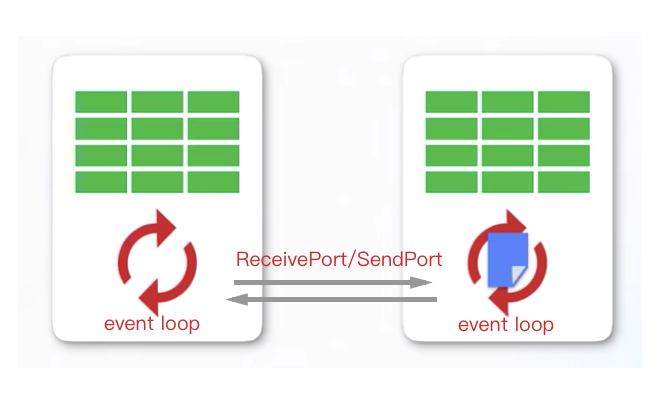
在Dart中,每个线程都运行在一个叫做isolate的独立环境中,它的内存不和其他线程共享,它在不停干一件事情:从事件队列中取出事件并处理它。
1 | while(true){ |
2 | event = event_queue.first() //取出事件 |
3 | handleEvent(event) //处理事件 |
4 | drop(event) //从队列中移除 |
5 | } |
比如下面这段代码:
1 | RaisedButton( |
2 | child: Text('click me'); |
3 | onPressed: (){ // 点击事件 |
4 | Future<Response> respFuture = http.get('https://example.com'); |
5 | respFuture.then((response){ // IO 返回事件 |
6 | if(response.statusCode == 200){ |
7 | print('success'); |
8 | } |
9 | }) |
10 | } |
11 | ) |
当你点击屏幕上按钮时,会产生一个事件,这个事件会放入isolate的事件队列中;接着你发起了一个网络请求,也会产生一个事件,依次进入事件循环。
在线程比较空闲的时候,isolate还可以去搞搞垃圾回收(GC),喝杯咖啡什么的。
API层的Future、Stream、async 和 await 实际都是对事件循环在代码层的抽象。结合事件循环,回到对Future对象的定义(An object representing a delayed computation.),就可以这样理解了:isolate大哥,我快递一个代码包裹给你,你拿到后打开这个盒子,并顺序执行里面的代码。
事实上,isolate 里面有两个队列,一个就是事件队列(event queue),还有一个叫做微任务队列(microtask queue)。
事件队列:用来处理外部的事件,如果IO、点击、绘制、计时器(timer)和不同 isolate 之间的消息事件等。
微任务队列:处理来自于Dart内部的任务,适合用来不会特别耗时或紧急的任务,微任务队列的处理优先级比事件队列的高,如果微任务处理比较耗时,会导致事件堆积,应用响应缓慢。

你可以通过Future.microtask 来向isolate提交一个微任务:
1 | import 'dart:async'; |
2 | |
3 | main() { |
4 | new Future(() => print('beautiful')); |
5 | Future.microtask(() => print('hi')); |
6 | } |
输出:
1 | hi |
2 | beautiful |
总结一下事件循环的运行机制:当应用启动后,它会创建一个isolate,启动事件循环,按照FIFO的顺序,优先处理微任务队列,然后再处理事件队列,如此反复。
多线程
注:以下当我们提到isolate的时候,你可以把它等同于线程,但我们知道它不仅仅是一个线程。
得益于异步 IO + 事件循环,尽管Dart是单线程,一般的IO密集型App应用通常也能获得出色的性能表现。但对于一些计算量巨大的场景,比如图片处理、反序列化、文件压缩这些计算密集型的操作,只单靠一个线程就不够用了。
在Dart中,你可以通过Isolate.spawn 来创建一个新的isolate:
1 | void newIsolate(String mainMessage){ |
2 | sleep(Duration(seconds: 3)); |
3 | print(mainMessage); |
4 | } |
5 | |
6 | void main() { |
7 | // 创建一个新的isolate,newIoslate |
8 | Isolate.spawn(newIsolate, 'Hello, Im from new isolate!'); |
9 | sleep(Duration(seconds: 10)); //主线程阻塞等待 |
10 | } |
输出:
1 | Hello, Im from new isolate! |
spawn 有两个必传参数,第一个是新isolate入口函数(entrypoint),第二个是这个入口函数的参数值(message)。
如果主isolate想接收子isolate的消息,可以在主isolate创建一个ReceivePort对象,并把对应的receivePort.sendPort作为新isolate入口函数参数传入,然后通过ReceivePort绑定SendPort对象给主isolate发送消息:
1 | //新isolate入口函数 |
2 | void newIsolate(SendPort sendPort){ |
3 | sendPort.send("hello, Im from new isolate!"); |
4 | } |
5 | |
6 | void main() async{ |
7 | ReceivePort receivePort= ReceivePort(); |
8 | Isolate isolate = await Isolate.spawn(newIsolate, receivePort.sendPort); |
9 | receivePort.listen((message){ //监听从新isolate发送过来的消息 |
10 | |
11 | print(message); |
12 | |
13 | // 不再使用时,关闭管道 |
14 | receivePort.close(); |
15 | |
16 | // 关闭isolate线程 |
17 | isolate?.kill(priority: Isolate.immediate); |
18 | }); |
19 | } |
输出:
1 | hello, Im from new isolate! |
上面我们了解了主isolate是如何监听来自子isolate的消息的,如果同时子isolate也想知道主isolate的一些状态,那该如何处理呢?下面的代码将提供一种双向通信的方式:
1 | Future<SendPort> initIsolate() async { |
2 | Completer completer = new Completer<SendPort>(); |
3 | ReceivePort isolateToMainStream = ReceivePort(); |
4 | |
5 | //监听来自子线程的消息 |
6 | isolateToMainStream.listen((data) { |
7 | if (data is SendPort) { |
8 | SendPort mainToIsolateStream = data; |
9 | completer.complete(mainToIsolateStream); |
10 | } else { |
11 | print('[isolateToMainStream] $data'); |
12 | } |
13 | }); |
14 | |
15 | Isolate myIsolateInstance = await Isolate.spawn(newIsolate, isolateToMainStream.sendPort); |
16 | //返回来自子isolate的sendPort |
17 | return completer.future; |
18 | } |
19 | |
20 | void newIsolate(SendPort isolateToMainStream) { |
21 | ReceivePort mainToIsolateStream = ReceivePort(); |
22 | //关键实现:把SendPort对象传回给主isolate |
23 | isolateToMainStream.send(mainToIsolateStream.sendPort); |
24 | |
25 | //监听来自主isolate的消息 |
26 | mainToIsolateStream.listen((data) { |
27 | print('[mainToIsolateStream] $data'); |
28 | }); |
29 | |
30 | isolateToMainStream.send('This is from new isolate'); |
31 | } |
32 | |
33 | void main() async{ |
34 | SendPort mainToIsolate = await initIsolate(); |
35 | mainToIsolate.send('This is from main isolate'); |
36 | } |
输出:
1 | [mainToIsolateStream] This is from main isolatemain end |
2 | [isolateToMainStream] This is from new isolate |
在 Flutter 中,你还可以通过一个简化版的compute函数启动一个新的isolate。
比如在反序列化的场景中,直接在主isolate进行序列化:
1 | List<Photo> parsePhotos(String responseBody) { |
2 | final parsed = json.decode(responseBody).cast<Map<String, dynamic>>(); |
3 | |
4 | return parsed.map<Photo>((json) => Photo.fromJson(json)).toList(); |
5 | } |
6 | |
7 | Future<List<Photo>> fetchPhotos(http.Client client) async { |
8 | final response = |
9 | await client.get('https://jsonplaceholder.typicode.com/photos'); |
10 | //直接在主isolate转换 |
11 | return parsePhotos(response.body); |
12 | } |
启动一个新的isolate:
1 | Future<List<Photo>> fetchPhotos(http.Client client) async { |
2 | final response = |
3 | await client.get('https://jsonplaceholder.typicode.com/photos'); |
4 | // 使用compute函数,启动一个新的isolate |
5 | return compute(parsePhotos, response.body); |
6 | } |
本示例的完整版:Parse JSON in the background

总结一下,当遇到计算密集型的耗时操作,你可以开启一个新的isolate来并发执行任务。不像我们常规认识的多线程,不同的isolate之间不能共享内存,但通过ReceivePort和SendPort可以构建不同isolate之间的消息通道,另外从别的isolate传来的消息也是要经过事件循环的。
参考资料
- Dart asynchronous programming: isolate and event loops
- The Event Loop and Dart
- Node.js 的异步 I/O 实现
- Dart Isolate 2-Way Communication
- 彻底搞懂Dart异步
关于Agile Studio工作室
我们是一支由资深独立开发者和设计师组成的团队,成员均有扎实的技术实力和多年的产品设计开发经验,提供可信赖的软件定制服务。
未经声明,本站文章均为原创,转载请附上链接:
http://blog.agilestudio.cn/Dart-Asynchronous-Programming/